What Is a Balanced Price Range (BPR) in Trading?
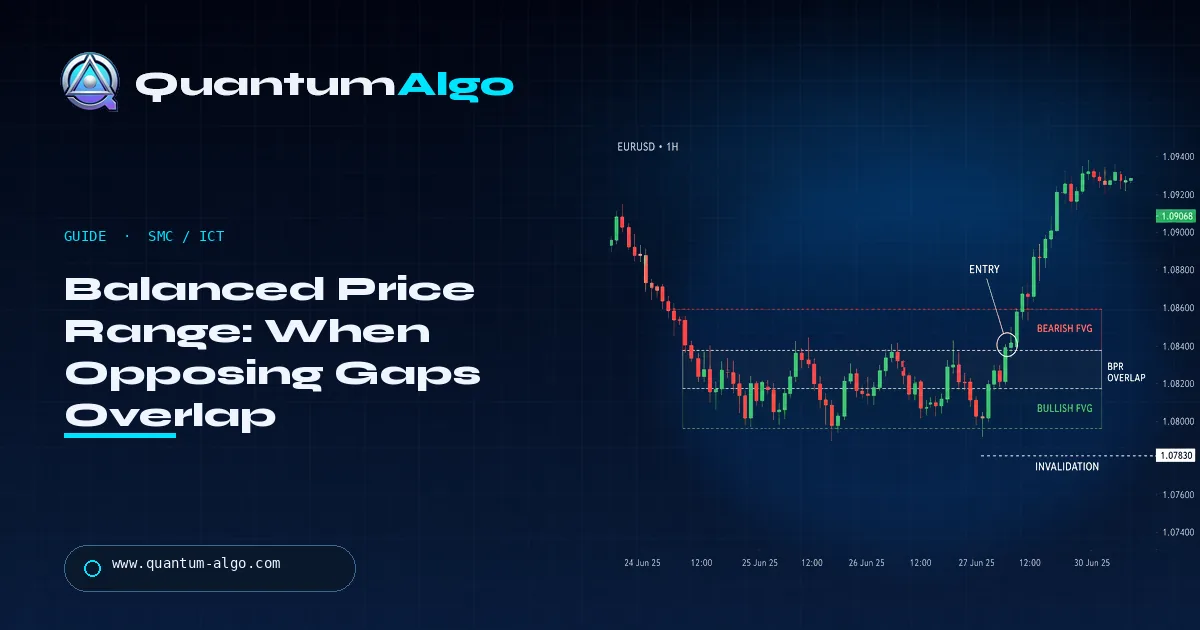
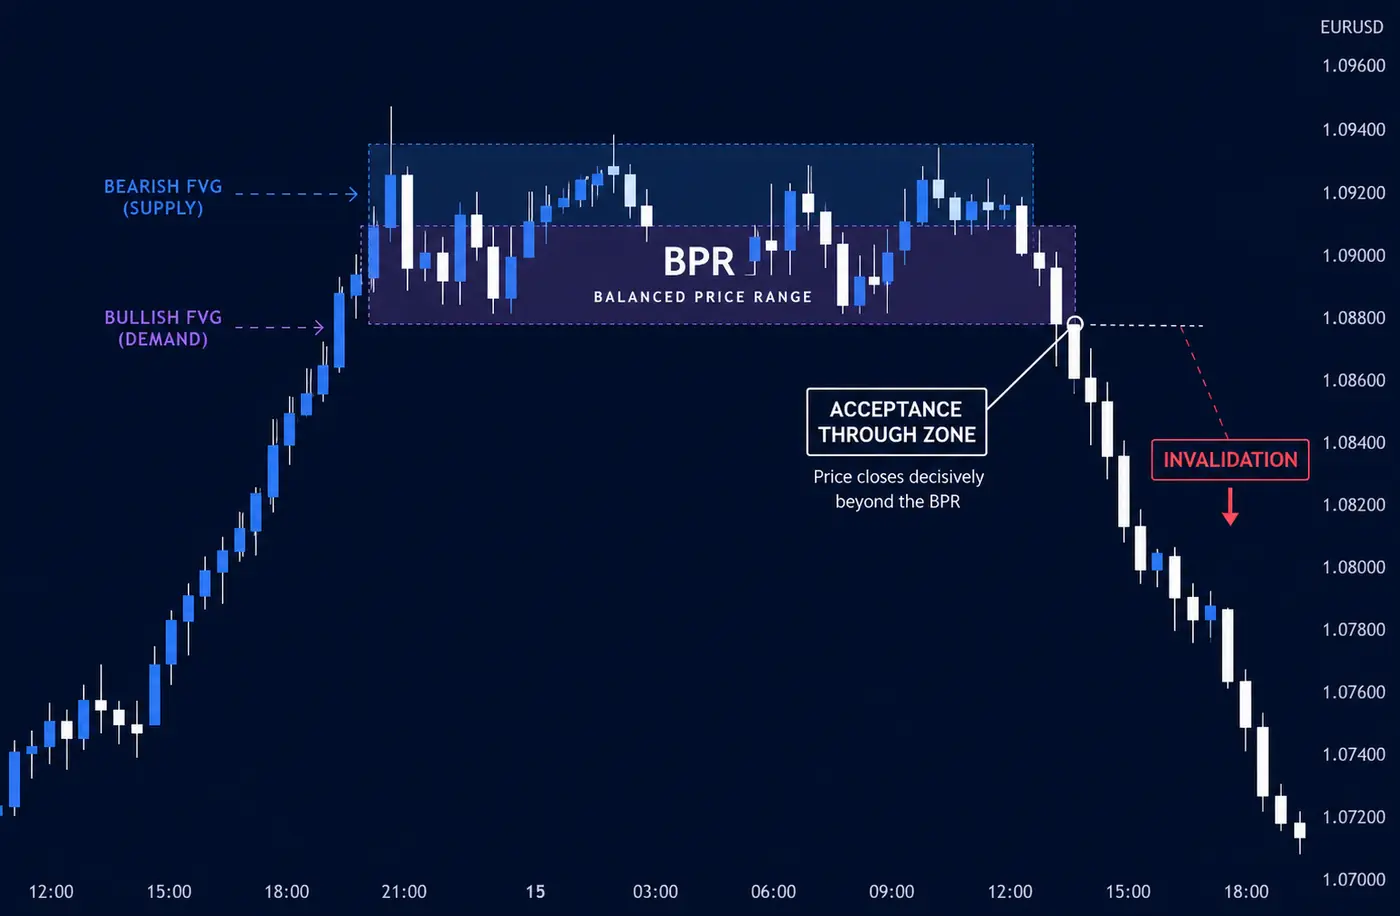
A Balanced Price Range is the overlap created when opposing fair value gaps meet in the same price area. It is a map of two-sided imbalance, not a magic rectangle. I want displacement, a clean return and a clear invalidation before treating the overlap as a tradable location.
BPR is one of those ICT terms that can look obvious after the fact and vague in real time. The useful definition is narrow: a bullish and bearish fair value gap overlap, creating a balanced zone where the auction has unfinished business. The zone matters because two imbalances disagree there; the trade still depends on delivery, timing and risk.
Indicators that prove themselves in public.
One engine, four precision tools — the Gold (XAU) Scalper, the institutional Gravity Zone, the Zeno momentum Oscillator, and Zeno Stocks for equities.
Use the guide as a decision filter, not as a collection of labels. The market, the session and the invalidation still decide whether an idea deserves risk.
What is a Balanced Price Range in ICT?
A Balanced Price Range forms when a bullish fair value gap and a bearish fair value gap overlap. The result is not simply “two boxes near each other.” The two gaps must share a price band, and that shared band becomes the area traders watch for a return, rejection or acceptance.
On a 15-minute EURUSD chart, the overlap may be only a few pips wide while the original gaps are much larger. I mark the shared part first. Calling the whole pair a BPR makes the zone look more precise than it is.
| Item | Value / rule | Why it matters |
|---|---|---|
| Definition | Zone where a bullish FVG and a bearish FVG overlap | Two opposing imbalances left in the same price band |
| How it forms | Impulsive move one way, then an equally impulsive move back through the same prices | Both legs show displacement; the overlap is the "balanced" range |
| Zone boundaries | Top = lower edge of the upper FVG · Bottom = upper edge of the lower FVG | Only the overlap counts, not either full gap |
| Directional read | Price returning to a BPR from above = expected support; from below = expected resistance | The most recent displacement sets the bias |
| Invalidation | Decisive close through the far side of the overlap | Acceptance inside the zone weakens it; a close beyond it cancels it |
| Best context | Higher-timeframe level + liquidity taken before the retest | A BPR in the middle of nowhere is just a gap |
How are the two FVGs that form a BPR created?
Each FVG comes from a three-candle imbalance. One side of the auction moves quickly enough to leave a gap between the first candle’s extreme and the third candle’s opposite extreme. Later, opposing delivery creates another gap that overlaps the first.
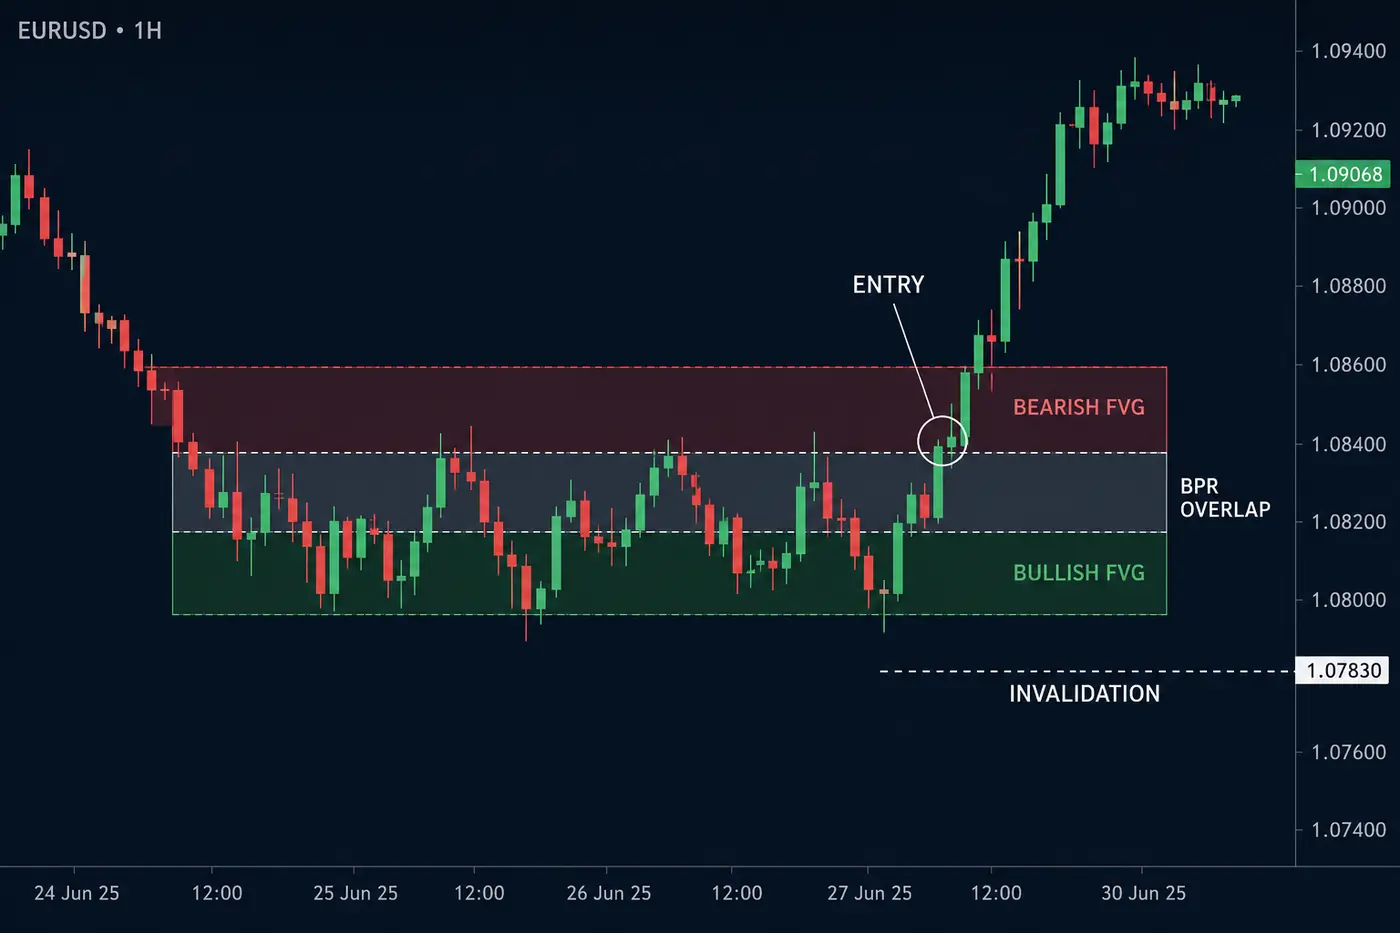
The quality of the displacement matters. A gap created by a strong move away from a meaningful level has more context than a tiny gap inside overlapping candles. I record the origin, the session and the liquidity that was available when the gap formed.
Does a BPR predict continuation or reversal?
No. A BPR identifies a location where price may react because opposing imbalances overlap. The next move depends on which side gets acceptance. A return that wicks into the zone and rejects can support continuation; a series of closes through it says the zone is being absorbed.
This is why I do not place a blind limit order at every BPR. The location is useful, but the reaction tells me whether the current side still controls delivery.
Where should the entry and invalidation sit?
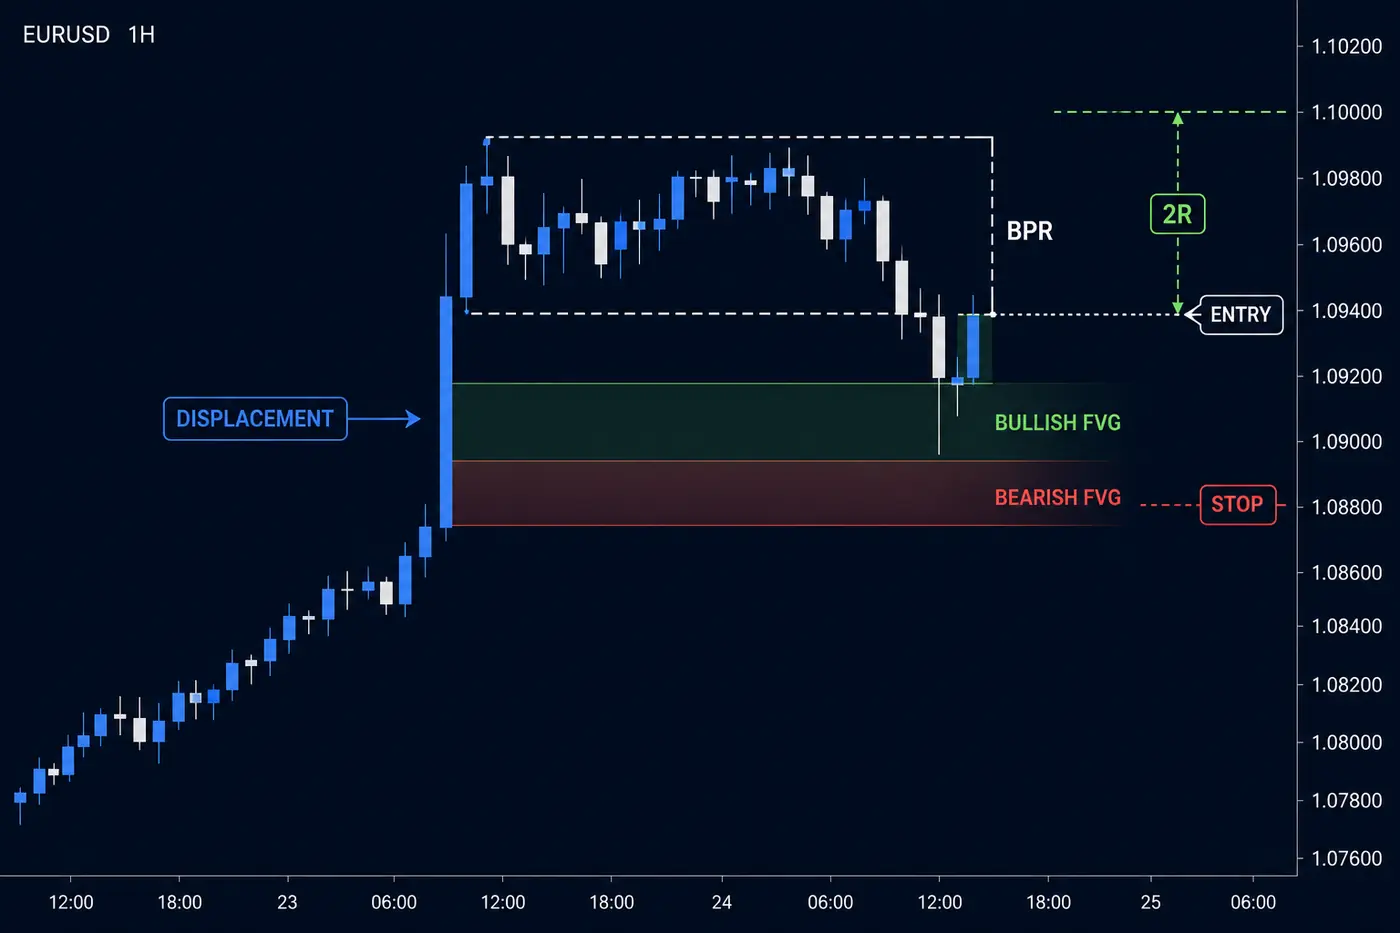
An entry can sit inside the overlap after a rejection, or after price reclaims the zone with a clear close and retest. The stop belongs beyond the price action that makes the BPR thesis wrong. A fixed three-pip stop is not a BPR rule; it is a hope disguised as precision.
Use the distance from entry to invalidation to determine size. If the BPR is wide, the position becomes smaller. If the required size no longer makes sense for the account or contract, pass on the setup.
How do you tell a real BPR from a messy overlap?
I look for three filters: opposing displacement, a visible shared band and a clean return. If the candles are already compressed before both gaps appear, the overlap may be ordinary noise. If the zone is repeatedly crossed, its information has weakened.
Session context helps. A BPR created during an active London or New York expansion has a different quality from one created during a quiet rollover. Mark the prior liquidity and ask what the displacement actually removed.
Which timeframe should map the range?
Use the higher timeframe to map the BPR and the lower timeframe to refine the reaction. A 1-hour BPR can define the area; a 5-minute displacement or reclaim can provide the execution evidence. Starting on 1-minute charts creates too many tiny overlaps and makes every pause look institutional.
Keep the mapping consistent in your journal. Compare like with like: a 15-minute BPR on EURUSD should not be judged against a 1-minute BPR on gold as though they share the same volatility.
How do you trade a BPR after displacement?
My preferred sequence is displacement, mark the opposing gaps, isolate the overlap, wait for the return, then read the response. A bullish version might displace upward, leave a bearish gap on the retracement and overlap an earlier bullish gap. The overlap becomes a decision band rather than a guaranteed buy.
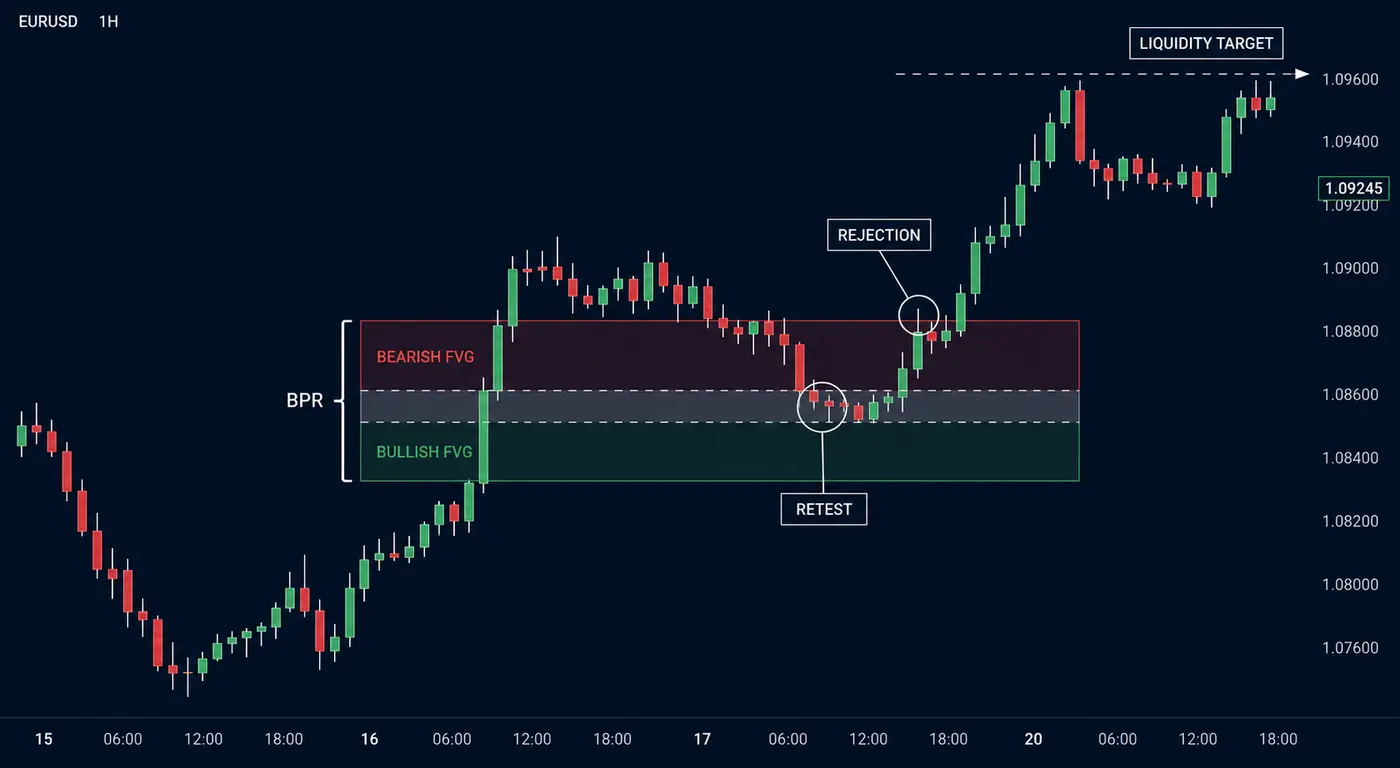
The example is a plan, not a live call. If price closes through the overlap and cannot reclaim it, the setup is invalid. For the broader structure vocabulary, read the fair value gap guide, the displacement guide and the liquidity sweep guide.
Can a BPR fail even when the zone is clean?
Yes. A clean zone can fail when higher-timeframe order flow, news, session timing or liquidity placement favours the other side. The point of a BPR is not to remove uncertainty. It is to make the uncertainty measurable: entry, invalidation and target are visible.
The free public Quantum Algo indicators mark order blocks and FVGs; they do not label a BPR as a proprietary signal. Zeno provides confirmed Buy/Sell signals with SL/TP and risk management. Keep those roles separate.
Can a bot execute a BPR plan?
A bot can execute a BPR plan if the zone, trigger, stop, target and expiry are coded. It cannot decide what “clean” means unless you define a measurable rule. That is the difference between a chart idea and an automation specification.
Quantum Algo’s free public indicators mark order blocks and fair value gaps; Zeno provides confirmed Buy/Sell signals with stop-loss, take-profit and built-in risk management. QuantumBot is the $199/mo automated execution service. Plans are $19, $39 and $79 per month; cancel anytime.
| Tool | What it measures | Its job in the plan |
|---|---|---|
| BPR | Overlap of opposing FVGs | Narrow decision band after delivery |
| Single FVG | One imbalance from displacement | Potential return location |
| Breaker block | Failed zone with role reversal | Structure-failure context |
| Random overlap | Compressed or repeated candles | Usually no distinct edge |
Why does a BPR need opposing delivery?
A BPR is not valuable because two coloured rectangles happen to overlap. The overlap matters when it records a real change in delivery: one side displaced price, the opposing move created a gap, and the shared band remains a place where the auction may rebalance. If both gaps come from tiny overlapping candles, the label adds vocabulary without adding information.
On a 5-minute EURUSD chart, I first mark the impulse that removed a local high or low. Then I identify the gap created by the impulse and the gap created by the opposing leg. Only the common price band becomes the BPR candidate. I do not expand it to include every candle around it. A narrow zone forces a better question: did price accept or reject this exact band?
The time between creation and return matters too. A fresh BPR that has not been crossed can offer a cleaner test than a zone tapped four times. That does not mean the first touch must reverse. It means the first return gives the market a chance to show whether the band still attracts responsive orders. A close through the band and a failed reclaim are more useful evidence than a wick that disappears on the next candle.
How do you rank a BPR before risking money?
I grade four things: delivery, location, freshness and target. Delivery asks whether the gaps were created by displacement rather than compression. Location asks whether the band sits near liquidity, a higher-timeframe level or a session extreme. Freshness asks how many times price has crossed it. Target asks whether there is enough clean space to earn a sensible multiple before opposing liquidity.
A perfect overlap in the middle of a weekly range can be worse than an imperfect overlap at a well-defined London low. Context wins. If the band is 30 pips wide on a quiet pair, it may also be too expensive for the intended risk. Either reduce size or reject it. Moving the stop inside the zone to make the position size look acceptable changes the trade rather than managing it.
For a bearish BPR, I prefer to see price return after a buy-side sweep, fail to hold above the shared band and then displace lower. For a bullish BPR, the mirror sequence is a sell-side sweep, reclaim and displacement higher. These are not mandatory shapes; they are ways to make the trigger explicit. If the return is slow and full of overlap, I wait for a smaller confirmation or leave the zone alone.
How can you backtest BPR without hindsight?
Freeze the definition before opening the sample. Decide what counts as a gap, the minimum displacement, the maximum zone width, how many retests invalidate freshness and what candle confirms the entry. Then mark every candidate, including the ones you reject. If you record only the attractive examples, the chart will teach you that every overlap worked.
Use R-multiples rather than pips because a 12-pip EURUSD stop and a 1.20-dollar XAUUSD stop are different risk events. Record session, market condition and whether the target was opposing liquidity or a fixed multiple. A BPR may have a lower win rate in a fast trend but a better average winner; the only way to know is to keep the categories separate.
What is the difference between a BPR retest and a BPR breakout?
A retest assumes the shared band can still attract a responsive reaction. A breakout assumes price is accepting through the band and that the original thesis is weakening or has failed. I do not call a wick through the zone a breakout. I want a close beyond the relevant edge, a failure to reclaim and enough follow-through to distinguish acceptance from a stop run.
This distinction matters for both directions. A bullish BPR can be a long location after a sell-side sweep, but a close below it that cannot reclaim turns the band into evidence against the long idea. A bearish BPR can reject a buy-side sweep, but a close through its upper boundary can show that sellers did not defend the overlap. The zone does not owe the trader a reversal.
When the zone is wide, the execution timeframe can create a smaller confirmation band inside it. That refinement is useful only if it is defined before the trade. Otherwise it becomes a way to move the entry and stop after seeing the first reaction. I record the original zone, refined zone and invalidation separately so I can see which decision added value.
The best BPR review includes rejected candidates. Count the zones that were crossed repeatedly, lacked a clear target or formed during compression. A model that appears perfect only after filtering out the bad examples is not ready for live execution. The point of a BPR framework is to make selectivity repeatable, not to make every chart contain a named pattern.
What should the BPR chart show before the entry?
Before an entry, I want the chart to answer five things without a paragraph of explanation: which side delivered, where the opposing gaps overlap, what liquidity was taken, where the return happened and what price would invalidate the idea. If those cannot be seen at the same zoom level, the zone may be too broad or the model too dependent on hindsight.
On gold, a BPR can form quickly around a news-driven displacement and appear precise because the candles are large. I wait for the post-event range to stabilize before treating the overlap as a trade location. On EURUSD, the same setup may develop more slowly through London and give a cleaner return. Market rhythm changes the quality of the same visual pattern.
Use a screenshot at creation and a second at entry. The first image shows what was actually known; the second shows the response. This simple habit makes it harder to redraw the overlap after the target has printed.
What is the BPR rule I would actually trade?
I would mark the narrow overlap created by opposing delivery, wait for a return after liquidity has been taken, and require a reaction or reclaim before entry. The stop goes beyond the price that invalidates the band. If the zone has no clean target or has been crossed repeatedly, it is a chart annotation, not a trade.
This rule also makes the concept portable across EURUSD, gold and indices. The numbers change, but the test stays the same: delivery, overlap, return, invalidation and room. A new name cannot compensate for missing structure.
What should the BPR checklist leave out?
It should leave out any overlap created only by compression, any zone widened after the reaction and any target chosen after the entry. If delivery, freshness and room are missing, the correct BPR decision is to pass.
That discipline is especially useful when reviewing a busy 1-minute chart. A small box can look precise while containing no meaningful auction information. Start with the higher-timeframe impulse and let the lower timeframe refine the return only after the context exists.
How does session context change a BPR?
A London-created BPR can be revisited during New York with a different liquidity objective. Mark whether the return occurs in the same session, the handoff or a quiet period. A zone that reacts during active delivery is not automatically stronger, but the session gives you a better explanation for the move and a more realistic expectation of spread and follow-through.
Gold and indices can expand through a BPR faster than EURUSD. I use the same structural test but allow the stop and target to reflect the instrument’s normal range. Never force a forex-sized stop onto XAUUSD because the box looks similar.
A BPR is the shared band between opposing fair value gaps. Mark only the overlap, wait for displacement and a return, and put the stop beyond invalidation. A clean rectangle is a location—not a signal.
◆ Interactive check
Can you separate a BPR from a random overlap?
Questions traders ask about smc / ict concepts
A Balanced Price Range is the overlapping area between an opposing bullish fair value gap and bearish fair value gap. Traders watch the shared band for rejection, acceptance or a return after displacement.
No. An FVG is one three-candle imbalance; a BPR is the overlap created by two opposing FVGs. The overlap is the specific area that gives the BPR its name.
Mark both opposing fair value gaps, then isolate only the price range they share. Record the displacement, session and nearby liquidity so the zone has context beyond its shape.
It is not automatically bullish or bearish. The reaction, displacement direction and acceptance around the overlap determine which side has control after the return.
An entry can follow a rejection inside the overlap or a reclaim and retest with a clear close. The trigger should be defined before the trade, not invented after the reaction.
Place the stop beyond the price action that invalidates the setup. Do not use a fixed pip distance without considering the zone width and current volatility.
Use a higher timeframe to map the zone and a lower timeframe to refine the reaction. A 1-hour map with a 5-minute trigger is often clearer than searching for every overlap on a 1-minute chart.
Yes. BPR is itself an SMC/ICT price-imbalance concept. Use public indicators to mark the underlying FVGs and structure, but do not treat a marked zone as a guaranteed entry.
The free public indicators mark order blocks, fair value gaps and related SMC structures. Zeno provides confirmed Buy/Sell signals with SL/TP and built-in risk management; it does not draw BPR labels.
QuantumBot can execute a fully specified BPR plan where a supported connection is available. The rules must define the zone, trigger, expiry, stop, target and risk limit.
Quantum Algo publishes a ledger showing 75% across 160 closed signals, with 120 wins and 40 losses. It is evidence to verify, not a promise for a BPR setup or personal results.
References & Related Guides
Read next
- Fair Value Gaps + Inversion FVG — Free FVG Indicator for TradingView (Gap Lifecycle, IFVG Signals, Multi-Timeframe)
- Fair Value Gaps: Complete Guide
- Displacement Trading Guide
- Liquidity Sweep Trading Guide
- Breaker Block Trading Guide
Authoritative sources
- CME Group: Proper position size
- SSRN: The Probability of Backtest Overfitting (Bailey, Borwein, López de Prado, Zhu)
- BIS: OTC foreign exchange turnover (Triennial Survey)
- TradingView: Fair Value Gap reference
- CME Group: fair-value-gap education
- ICT concepts: fair value gap reference